
With the workshops completed, this morning’s goal is to design and build the prototype. Not everyone involved has to be in this activity. It’s easy to work with fewer people who are experienced working together and used to design work.
Storyboard review

With your trimmed-down team gathered, the first job of the day is for them to mark 2 or 3 of the most important screens from the storyboard that really have to be in the prototype, or it will not make any sense. These slides will probably take the most time, so will need to be made first.
Delegate and assign tasks.
In the huddle decide who will do what…
1 person should own the responsibility of getting the prototype created but can share this design work ensuring no one is working on the same screen.
Others can be responsible for finding particular content: images, copy, marketing text. Or just one person can do all this especially if you’ve had a lot of images and copy supplied from the business beforehand.
Someone needs to take care of sustenance to ensure, drinks and snacks are freely available and lunch is organised. This leaves prototypers to be focused on their work and not have to worry about those things, enabling the team to stay in the flow.
Another person, is the recruiter for the user testers. Tasks they can start earlier are listed in the afternoon’s activity.
Have check-ins throughout the day: midday, so everyone can come in and look at the work that’s been done and see what’s left to do. Then a second check-in about an hour before the end of day time. Then it’s about just finishing what’s already there.
Tools and techniques to build your prototype:
Figma, for designing the screens and collaborating where everyone can work on the same file at the same time.
Font Awesome and The Noun Project, for fonts and icons.
Unsplash, for high quality photos.
InVision and Marvel, to make the screens into a clickable prototype. Start building this first thing with blank placeholder screens, and add Figma designs later.
You don’t have to make the tech to simulate what the tech will do. All you need to do is find a way to fake it and simulate it, and show that to people who can experience the tech and give you valuable feedback.
Pitfalls to watchout for:
Second guessing what the prototype will do and changing the direction of the prototype and do something else instead. Don’t do this. It will cause confusion, stressed-out individuals and derail the desired feedback. Stick to the storyboard as the template for the prototype.
The designers have a very short amount of time to get the prototype built, so keep focussed on what’s important and don’t go over schedule and ensure people only review their work at the scheduled check-in times.
Make sure people don’t break from their focussed work to hunt down drinks, snacks or know what’s for lunch. This is all worked out at the beginning of the day.
Ensure energy is managed, so regular short breaks.
Ensure the team communicate who is working on what so there’s not duplication of work.
Avoid placeholder content. No lorum ipsum and lines to covey copy. The content should look real.
Afternoon’s goal: Prepare, recruit and schedule user tests.
Find out who the target group of users are. Try and find out early, but this might not be known until after day 2 as it’s dependant on the concept chosen.
Use networks either the business currently has, or you do. For example if you need accountants, you could easily know 5 of them from your network. Referals from people you know are more reliable testers, than those recruited from the internet. To recruit from outside of your network, you can run an advert (Facebook, Instram, popular listing pages or relevant forums) to find the right target group of people. You might be able to start on the recruitement following day 2’s outcome. Start it as soon as possible.
Include in the advert:
Who your company is and why they need testers, as you’ll need to gain people’s trust.
Who you’re looking for: age, location, type of behaviour (home renters, car owners, busy & hungry)
What the proposition is about, but don’t give too much away
When the test is and how long it will take
What the incentive is (Amazon vouchers for example)
Link to a form to qualify the testers, to make sure they’re a good fit, using further questions related to your new proposition and their availability.
Invite the qualifying people to the test, via your personal email rather than just an automated scheduling tool, as this reduces people not showing up.
Schedule the tests with the 7 users you’ve selected - 2 are backups on standby. Allow about 45 minutes for each test and include 10 minutes contingency in case of any issues. Make sure the first one is as early as possible and allow an hour before the following test, so there’s time to make a tweak for the next tester. The next 4 testers are scheduled in close succussion to leave time in the afternoon to download the feedback, summarise and understand it.
Prepare for the interviews with the testers. 2 people from the design sprint, who know the prototype and sprint questions really well should conduct the interview: one interacting with the tester and the other taking notes.
Tools & setup for the testing
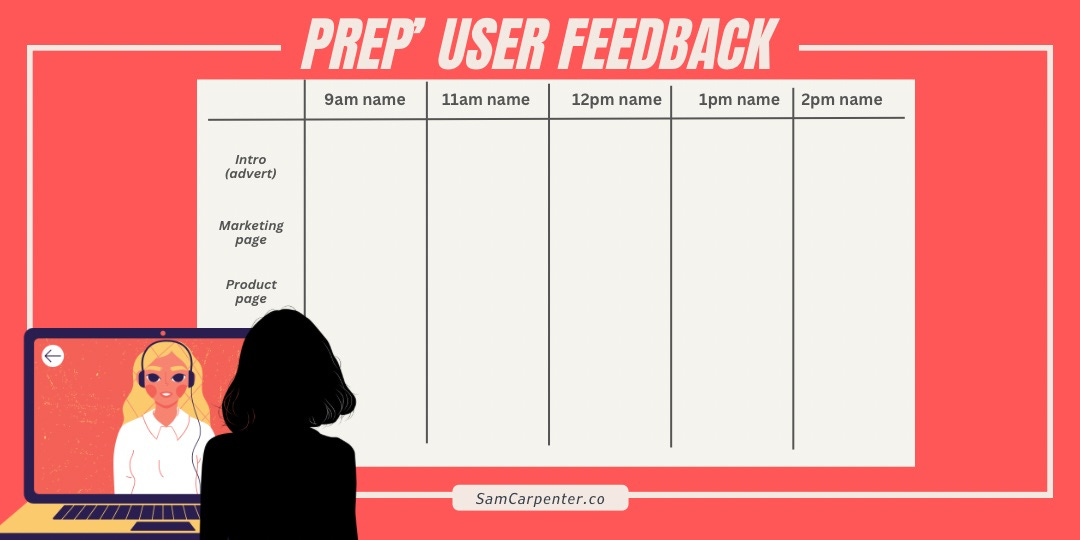
Prepare the feedback capture area, using either a large wall area or online canvas, I like Miro. Following a board like my image above instead of a script will allow for a free-flowing conversation.
In person, just have a way to show the user the prototype to test it, such as a mobile device or laptop and a camera if you want to film it.
If it is a remote test session, a computer with a webcam, like a laptop, and a video conferencing tool, like Appear.in (web based on most browsers), Zoom or Google Hangouts. Once you’re on the call you can share the link to your digital prototype.
A good setup is:
a dedicated room to conduct the interview (in person or remote)
a computer connected to a separate large screen
a webcam sitting further away so that both interviewers can be seen
Video conference tool
Optional: a live stream to a private YouTube channel with software installed called OBS, that connects to the stream and to the internet.
With this you’re very well prepared for tomorrow. That concludes Day 3’s Design Sprint activity.
If you want more support, to either coach or train you further, or run a sprint for you, please contact me - see ‘4 Links’ in my profile area.